
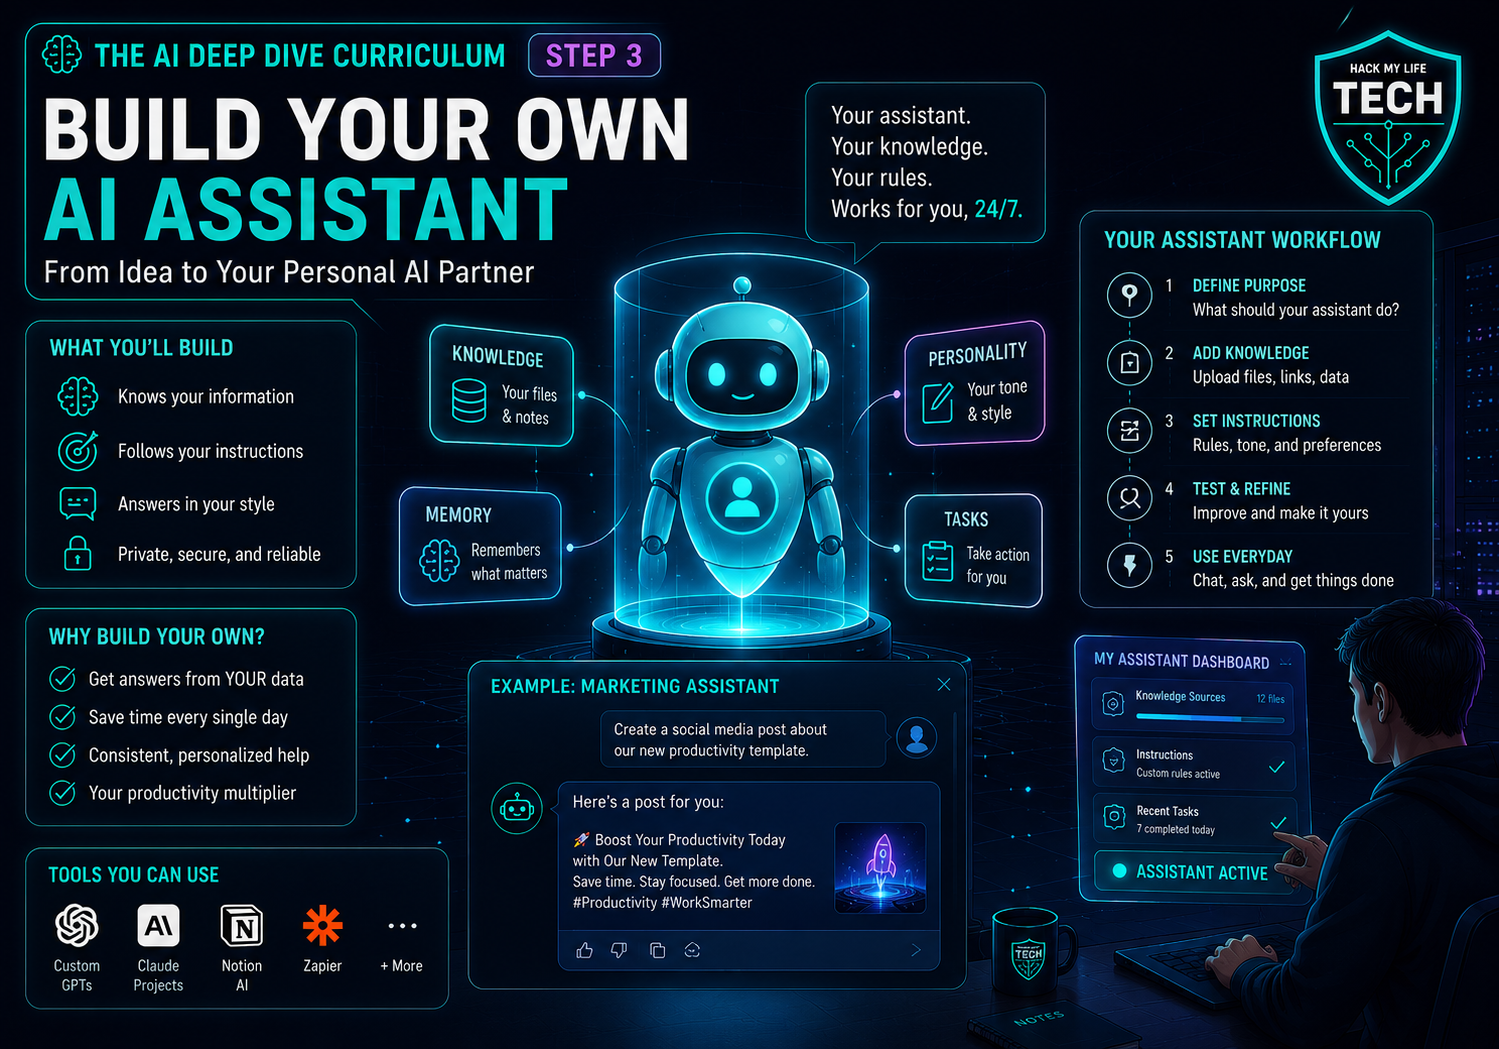
Welcome back to the AI Deep Dive curriculum. You’ve now built two halves of a superpower. In Step 1 you engineered how your AI thinks — custom instructions, chains, context. In Step 2 you gave it what to think about — your files, grounded through RAG. This lesson combines them into a reusable assistant configuration.
Here’s the reframe that runs the whole lesson:
💡 Every time you re-paste your instructions and re-upload your files, you’re re-hiring the same employee from scratch every morning. A custom AI assistant can reduce repeated setup by storing standing instructions and, where supported, reusable reference material. You still need to update sources, review outputs and retest the assistant when the platform or task changes.
By the end you’ll know the anatomy of a custom assistant, be able to build one on any major platform with zero code, and — crucially — know how to test it like a hiring manager before you trust it with real work.
1. From Prompting to Delegating: Why Assistants Change the Game
Regular prompting, even expert prompting, has a hidden tax: repetition. Every fresh chat is a blank employee. You re-explain who you are, re-state your formatting rules, re-upload the same policy PDF. It works — but you pay the setup cost every single time.
A custom assistant can reduce repeated setup, although the amount of time saved depends on the platform, task and quality of the setup. Think of the difference as hiring models:
- Prompting is calling a brilliant temp agency every morning — you brief a new, amnesiac genius from scratch daily.
- A custom assistant is hiring a specialist onto your team — briefed once, they arrive every day already knowing the job.
This is the compounding payoff of everything in Level 2 so far. Your Step 1 instructions and Step 2 knowledge stop being things you do in each chat and become things your assistant is.
2. The Anatomy of a Custom Assistant
Whether the platform calls it a Custom GPT (ChatGPT), a Project (Claude), or a Gem (Gemini), Many no-code assistant builders share three common building blocks: instructions, reference knowledge and optional capabilities. However, file limits, retrieval behaviour, model access, sharing controls and pricing vary by platform and plan. Master the anatomy once and you can build on any tool.
🧠 Ingredient 1 — Instructions (the personality & rulebook)
This is a permanent system prompt you author — the standing instructions from Step 1, now living inside the assistant instead of your clipboard. It defines the role, the tone, the hard rules, and what “done right” looks like.
This is where you write things like “You are a listing-writer for a vintage clothing shop. Always output a title under 60 characters, three benefit bullets, and a friendly-but-honest tone. Never invent measurements or materials you weren’t given.”
📚 Ingredient 2 — Knowledge (the reference shelf)
This reuses Step 2’s grounding approach in a maintained configuration. You attach the files the assistant should always know — your brand guide, your product catalog, your course syllabus, your policy docs. Depending on the service and its settings, attached files may be available as reusable project or assistant knowledge. Sources still need updating, and important outputs require verification. The garbage-in-garbage-out rule from Step 2 still governs: a specialist is only as reliable as the shelf you give it.
⚙️ Ingredient 3 — Capabilities (the tools)
Depending on the platform, you can toggle powers: web search, image generation, code/data analysis, or connections to other apps. A research assistant needs live search on; a confidential-document analyst might have it off. Give your specialist exactly the tools its one job requires — no more.
💡 The formula: Instructions (Step 1) + Knowledge (Step 2) + Capabilities = a reusable specialist. Level 2 has been building to this the whole time.
3. Build One in Five Steps (Platform-Agnostic)
The buttons differ across ChatGPT, Claude, and Gemini, but the recipe is identical:
- Pick one narrow job. The single biggest mistake is building a vague “does-everything helper.” Specialists beat generalists. Build a “weekly-report drafter,” not an “AI assistant.”
- Write the instructions. Draft an R-C-T-F-E briefing (Step 1) describing exactly who it is and what good output looks like. Be specific about the rules and the format.
- Load the knowledge. Attach your curated, current, clean files (Step 2). Only what this one job needs — resist the urge to dump your whole drive.
- Set the capabilities. Turn on only the tools the job requires.
- Test, then trust. Do not deploy on faith — interview it first (next section).
⚠️ A note on platforms: Assistant-builder features and names change fast, and one detail matters for privacy — a published/shared Custom GPT can expose its knowledge files to users.
Keep sensitive assistants private, and check each platform’s current sharing and data settings before uploading anything confidential. This lesson teaches the durable method; verify the buttons on the official docs.
4. The Hiring-Manager Test: Interview Before You Trust
You wouldn’t give a new hire the keys on day one without a trial. Your assistant deserves the same scrutiny — and this is where your Essentials Step 7 verification instincts pay off. Run three interview rounds before you rely on it:
- Round 1 — The known-answer test. Ask questions you already know the correct answers to. Does it pull the right facts from its knowledge files, or is it guessing? This catches a badly-grounded shelf.
- Round 2 — The format test. Give it a real task and check whether it obeys the rules you wrote — the character limit, the tone, the structure. If it drifts, your instructions need sharpening, not the model.
- Round 3 — The edge-case test. Ask something outside its lane, or something its files don’t cover. A well-built assistant should stay in character and admit the gap (“I don’t have that in my materials”) rather than confidently hallucinating. This is the most important round.
Failing a round isn’t failure — it’s feedback. Weak grounding? Fix the files. Ignored rules? Rewrite the instructions. Confident nonsense on edge cases?
Add a guardrail line (“If it’s not in your knowledge, say so”). Iterate until it passes all three, then delegate. That loop — build, interview, refine — is the actual skill of this lesson.
🙋 5. Common Beginner Questions: Three Practical Scenarios
(Representative scenarios beginners commonly ask about — answered without the jargon.)
Q1 — Scenario: a stay-at-home parent running a resale shop: “Building an ‘AI assistant’ sounds like something for programmers. Realistically, what’s the first one I should build, and is it actually free?”
Answer: No programming, and No programming may be needed, but availability, file limits and pricing depend on the platform and plan. Check the provider’s current official documentation before building. A narrow assistant can reduce repeated work, but it is not automatically free or permanently available.
Q2 — Scenario: an office worker whose team drowns in inconsistent docs: “In Step 1 you mentioned a shared team assistant. How does that actually work, and does it really fix the consistency problem better than everyone just pasting instructions?”
Answer: It can improve consistency by placing shared instructions and reference documents in one maintained workspace. However, it does not guarantee identical outputs or remove human review. Test representative team tasks before relying on it — the goal you couldn’t reach by asking people to “prompt better.” Two cautions from this lesson’s fine print, though.
First, run the hiring-manager test as a team so the assistant reflects everyone’s real tasks, not just yours.
Second — and this is critical — mind the sharing settings: sharing may expose instructions, outputs, or uploaded knowledge depending on the platform and permissions, so never load confidential material into a broadly-shared assistant without checking your platform’s current data and permission rules.
Build it right and you’ve turned “please follow the style guide” into “just use the team assistant.”
Q3 — Scenario: an AI-major student who suspects it’s just a wrapper: “Isn’t a Custom GPT just my instructions and files auto-pasted into a normal prompt? If so, why bother — what does it actually add over a good prompt template?”
Answer: Your mental model is essentially correct, and that’s exactly why it’s powerful rather than disappointing. Under the hood, yes — At a high level, a custom assistant packages standing instructions and, when supported, retrieves relevant material from attached files. It usually does not retrain the model. Retrieval behaviour, context limits, model choice and available tools depend on the product and plan.
It isn’t a retrained model; it’s persistent, packaged context engineering, which is precisely the Level 2 thesis.
What it adds over a pasted template is fourfold and non-trivial:
persistence (the configured context is reused, reducing some manual copy-and-paste errors while still requiring maintenance and testing), distribution (you can share a configured assistant with authorised teammates, subject to platform permissions and change controls — a template in a doc gets modified, a shared assistant doesn’t drift), integrated retrieval (your files are searched and injected automatically rather than dumped whole, which sidesteps the lost-in-the-middle problem from Step 1), and encapsulation (the complexity is hidden behind one click, so users can access a maintained prompt structure without rebuilding it each time).
So you’re right that there’s no magic — but “reliable, distributable, self-grounding context, packaged for reuse” is a genuine engineering upgrade over a template you have to remember to paste correctly every time. The absence of magic is the point: you now understand your tools well enough to see exactly what they are.
6. Cheat Sheet:
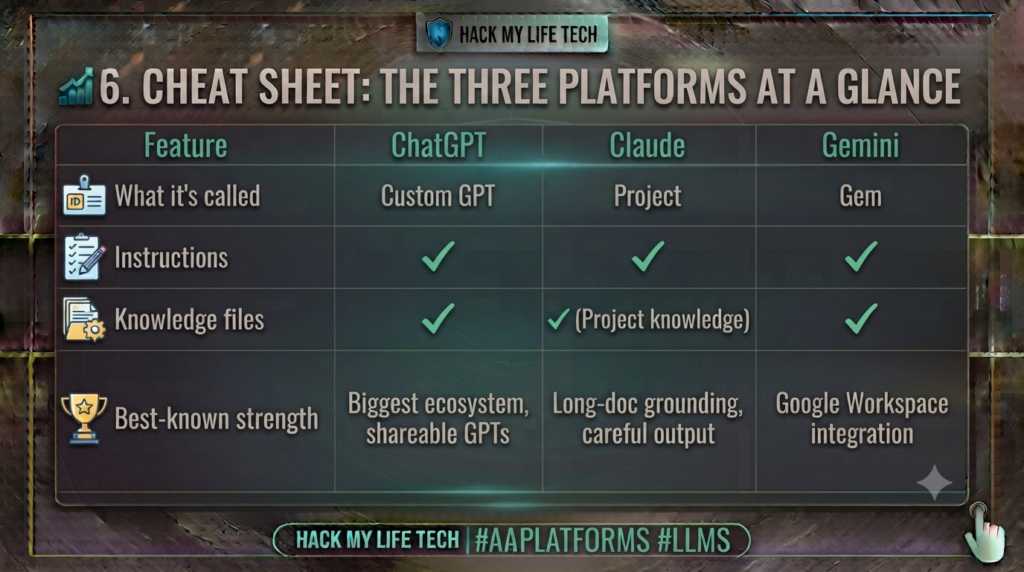
Feature details shift often — verify current capabilities and sharing/privacy settings on each platform’s official docs before building.
The build loop: one narrow job → instructions (Step 1) → knowledge (Step 2) → capabilities → hiring-manager test → delegate.
⚡ 7. Try It Today: Build Your First Specialist in 20 Minutes
Concepts become capability the moment you ship one. Build a real assistant now:
- Choose one narrow, repetitive task (2 min). The one you dread doing weekly. Name the assistant after that job, not “helper.”
- Write its instructions (8 min). One R-C-T-F-E block: role, rules, format, one example of great output.
- Give it knowledge (5 min). Upload 1–3 curated files it should always know. Clean and current only.
- Run the hiring-manager test (5 min). Known-answer, format, and edge-case rounds. Note what fails and fix the files or the instructions.
Twenty minutes in, you’ll have a reusable teammate — not a chat you’ll lose in your history tomorrow. That’s the leap from using AI to building with it.
📝 8. Recap & What’s Next?
Today you hired your first AI employee:
- Assistants beat prompting by killing the repetition tax — briefed once, ready every day.
- The anatomy: Instructions (Step 1) + Knowledge (Step 2) + Capabilities = a reusable specialist, no code required.
- The method is platform-agnostic: Custom GPT, Project, or Gem — same recipe, different buttons.
- The hiring-manager test (known-answer → format → edge-case) is what separates a trustworthy specialist from a confident hallucinator.
You’ve now built assistants that think and write for you. In the next phase — the Creation Studio — we leave text behind and pick up a new medium entirely.
Next lesson, you’ll learn to art-direct AI image generation: the prompt formula for visuals, keeping a consistent style and brand, and the commercial-rights basics most tutorials skip. Your one-person media pipeline starts now.
⏮️ Previous Lesson: [Deep Dive Step 2] Feed the Machine: Your Files, Your Data & RAG
⏭️ Next Lesson: [Deep Dive Step 4] AI Image Generation: Prompt Like an Art Director
Sharing and maintenance note
A custom assistant is a maintained configuration, not an autonomous expert. Review its permissions, uploaded files, sharing scope, retention settings, and answers. Remove outdated sources and test access from a separate authorised account before wider use.