
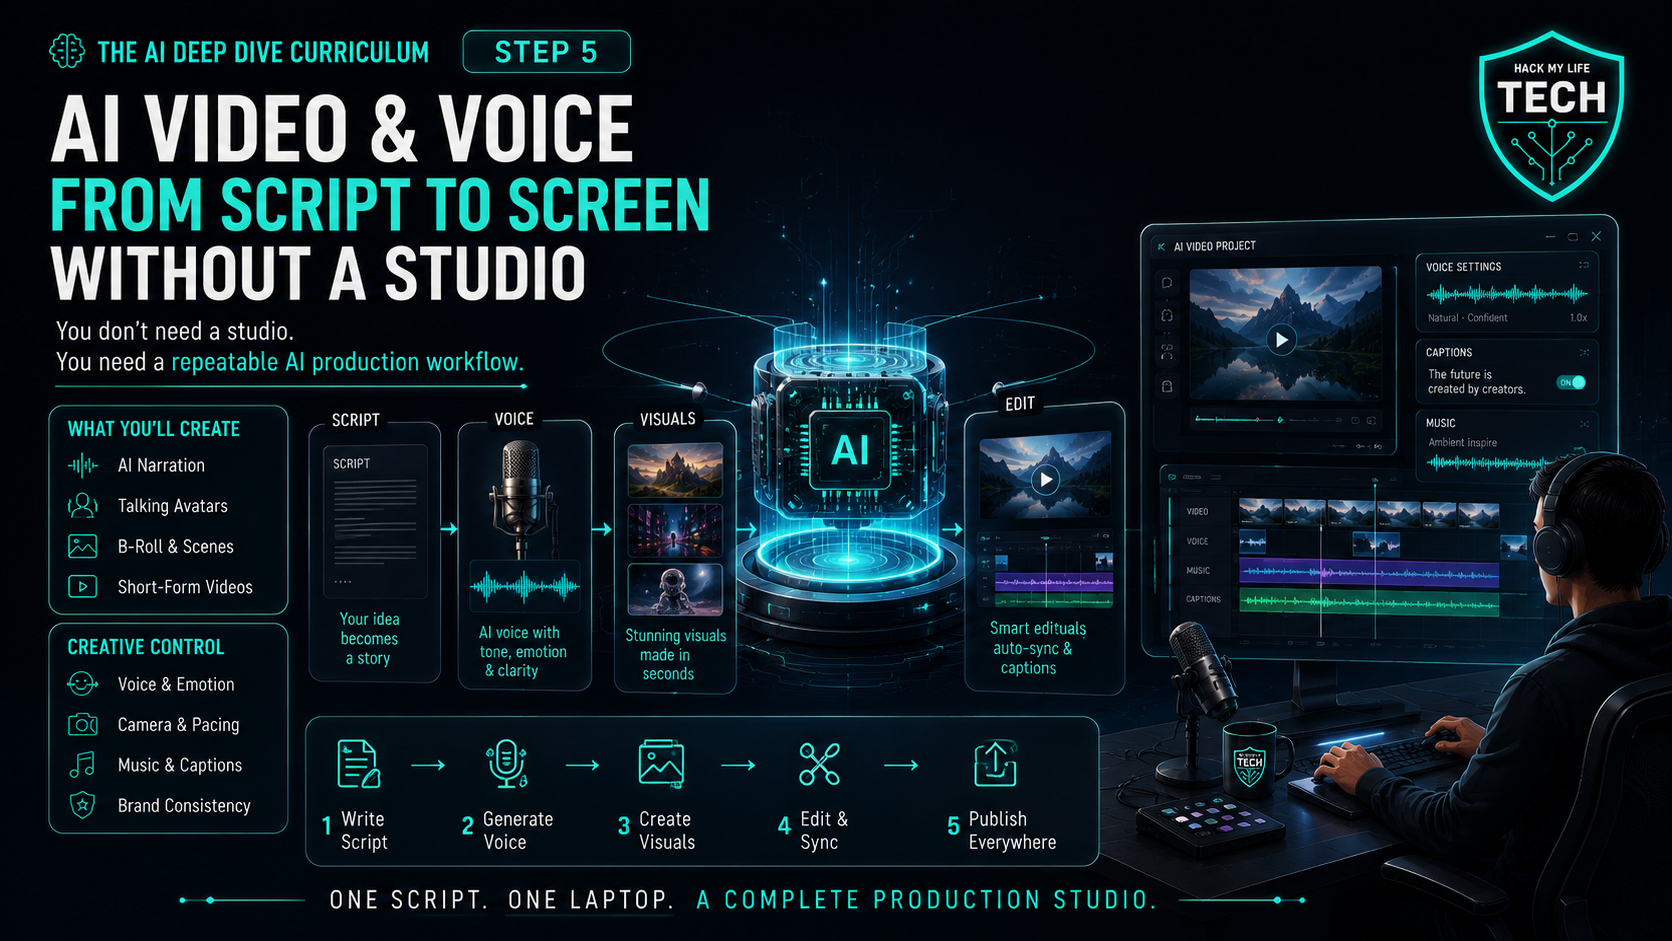
Welcome back to the Creation Studio. In Step 4 you learned to art-direct still images — subject, style, composition, lighting, medium. Today those stills start moving and talking. By the end of this lesson, you will understand a practical workflow for planning, generating and assembling short video and voiceover projects as a solo creator.
Here’s the reframe that runs the whole lesson:
💡 AI does not generate movies. It generates shots — a few seconds at a time. The people producing great AI video aren’t finding a magic prompt; they’re writing in shots, generating in pieces, and assembling like editors. Stop asking for a film. Start directing a shot list.
⚠️ Snapshot warning (read this first): Everything about specific tools below reflects July 2026. Video and voice AI is the fastest-moving corner of this entire field — models top the leaderboard and get discontinued within a single year.
The pipeline and skills in this lesson will outlive every product name in it. Verify current tools and terms before you subscribe to anything.
1. The Honest State of AI Video (July 2026)
Before the pipeline, calibrated expectations — because the demo reels you see online are the best 4 seconds out of fifty attempts.
What’s genuinely solved: Quality is no longer the bottleneck. Several current video models support 1080p or 4K in selected modes, and some also offer native audio, but resolution, duration and audio features vary by model, plan and workflow — Google’s Veo 3.1 generates speech at 48kHz, and Kling 3.0 added multilingual lip sync in early 2026. A clip that would have screamed “AI” in 2024 can now pass for stock footage.
What’s still hard: Models continue to fail in predictable places — hands, fast motion, face continuity across shots, physics, and audio that doesn’t quite match what’s on screen. Most importantly for your workflow: models still work best on short clips. Longer sequences are built by stitching multiple generated shots, not by hoping for one perfect long generation.
What changes quickly: Model availability, resolution, audio support, duration, pricing, and commercial terms vary by provider and plan. Compare tools with the same short test brief, then verify current capabilities and licence terms in each provider’s official documentation before subscribing or publishing.
Product availability can change or be discontinued. Keep source files and prompts portable, and verify a provider’s current status page and documentation before building a long-term workflow around one model.
- Source: Google AI for Developers, “Video generation in the Gemini API.” Accessed August 5, 2026.
- Source: OpenAI, “What to know about the Sora discontinuation.” Accessed August 5, 2026.
The takeaway that saves you frustration: treat AI video as a shot generator, not a movie maker. Expectation mismatch — not tool quality — is what makes beginners quit.
2. The One-Person Pipeline: Script → Visuals → Voice → Assembly
Here is the realistic workflow. Notice that three of the four stages use skills you already own from earlier lessons.
🎬 Stage 1 — Script (your LLM, Steps 1–3)
Write the script as a shot list, not as prose. This single habit is the difference between usable output and frustration. Ask your AI assistant: “Turn this 60-second script into 8 shots. For each shot give: the visual description, camera movement, on-screen action, and the narration line. One action per shot.”
You now have a production document instead of a wish. If you built a custom assistant in Step 3, bake this format into it and every future script arrives shot-ready.
🎨 Stage 2 — Visuals (your Step 4 skills, now moving)
For many beginners, image-to-video can provide more control over the starting composition than text-to-video alone: generate a still you love using your Step 4 S-S-C-L-M formula, then animate that image. You control composition, style, and brand before motion begins, although results can still vary by model, settings and prompt.
Also mine your existing library: real photos, screen recordings, and B-roll you already own can be animated or extended, and mixing real footage with generated shots is what makes small productions look professional.
🎙️ Stage 3 — Voice
Modern text-to-speech is good enough that narration is no longer a bottleneck, and the workflow is the same everywhere: paste your script, pick a voice, adjust pace and emphasis, export.
Three practical notes: write for the ear (short sentences, contractions, no long clauses); generate line by line so you can regenerate a single bad read instead of the whole track; and remember that your own recorded voice, even on a phone, still beats a synthetic one for authenticity when your face and name are on the channel.
✂️ Stage 4 — Assembly
This is where amateur and professional separate, and it’s not an AI step — it’s an editing step. Cut on the beat, add captions (most social video is watched muted), layer music at low volume under narration, and ruthlessly delete any generated shot with a visible artifact. The edit is where quality comes from. Ten good seconds beat thirty mediocre ones, every time.
3. Prompting for Motion: What Changes From Step 4
Your S-S-C-L-M image formula still applies — motion just adds three ingredients:
- Action: what actually happens in the shot. One action per shot. “The woman turns her head and smiles,” not “she walks in, sits, opens a laptop, and takes a call.”
- Camera: direct the lens explicitly. “Slow dolly in,” “static tripod shot,” “handheld follow,” “aerial pull-back.” Camera language is the strongest lever you have over how professional a clip feels.
- Pacing: keep generated shots short by design — a few seconds each. Short shots hide model weaknesses; long shots expose them.
Motion-prompt template: [Step 4 image description] + [one clear action] + [camera movement] + [pacing/mood]. Example: “Overhead flat-lay of a steaming ceramic coffee cup on an oak table, warm minimalist style, soft window light — steam rises gently, slow push-in, calm and unhurried.”
And the pro habit worth stealing: generate three takes of each shot and keep the best. Directors shoot multiple takes for the same reason.
4. The Voice Line You Don’t Cross
Voice cloning deserves its own warning, because the technology is trivially easy and the ethics are not. Two rules:
- Clone only your own voice, or one you have explicit, documented permission to use. Cloning someone else’s voice without consent ranges from unethical to illegal depending on where you are, and voice is increasingly treated as personal identity, not raw material.
- Never put words in a real person’s mouth. This connects straight to Essentials Step 7: synthetic audio of an identifiable person saying something they never said is a serious way to cause deception, reputational harm, or legal risk — and, as the next section shows, it’s now squarely regulated.
5. The Disclosure Era Arrives (And the Date Matters)
This is the section most video tutorials skip, and right now it’s the most urgent thing in this lesson: the EU AI Act’s transparency obligations (Article 50) become enforceable on 2 August 2026.
The practical shape of the rules for anyone publishing synthetic media:
- Deepfake disclosure: under Article 50, the relevant provider or deployer may have to clearly disclose that realistic AI-generated or manipulated content has been artificially created or altered; the exact duty depends on the system, content and actor’s role — clearly perceivable, on or in the content, not buried in a settings menu. For video, that means a label at the start or a persistent on-screen marker.
- Machine-readable marking: Providers of generative AI systems must use appropriate machine-readable marking measures, while creators should follow the disclosure and provenance requirements that apply to their platform, jurisdiction and publishing context. In practice, C2PA Content Credentials are one recognised technical method for recording digital provenance, but they should not be presented as the only compliance method or as a substitute for visible disclosure when visible disclosure is required, alongside complementary watermarking approaches.
- Artistic and satirical work isn’t exempt, it just gets a lighter-touch, less intrusive label.
- The stakes are real: non-compliance can reach penalties in the tens of millions of euros or a percentage of global turnover for the worst cases.
- Source: The EU AI Act’s Transparency Rules: A Practical Guide to Article 50. Accessed July 2026.
What this means for you, practically: even if you’re a solo creator outside the EU, the direction is unmistakable and platforms are adopting it globally.
Build three habits now: label AI-generated video visibly (a simple “Created with AI” in the first frame or description costs nothing), keep provenance credentials intact rather than stripping metadata, and use each platform’s built-in AI-content disclosure toggle when you upload.
As covered in Essentials Step 7 — build the honest-labeling habit early and the workflow is easier to adapt when rules or platform policies change.
🙋 6. Common Beginner Questions: Three Practical Video Scenarios
(Representative scenarios beginners commonly face when building a video workflow — answered without jargon.)
Q1 — Scenario: a beginner starting a YouTube channel: “Every AI video demo looks amazing, but when I try it I get weird hands and melting faces. Am I doing it wrong, or is the hype fake — and can I do this free?”
Answer: You’re not doing it wrong; you’re comparing your first take to someone’s fiftieth. Those demo reels are the best four seconds of dozens of generations, and the failure modes you’re hitting — hands, faces, fast motion — are exactly the known weak spots from Section 1. Three fixes change everything.
First, avoid the hard stuff: shoot around close-up hands and human faces by favoring objects, landscapes, food, text-on-screen, and B-roll — your channel probably doesn’t need a generated human at all.
Second, use image-to-video rather than text-to-video, so you approve a still you already love before it moves.
Third, keep shots short and edit hard — three seconds of a beautiful clip beats ten seconds that slowly degrade.
On cost: Some tools offer free or trial access for learning, but availability, watermarks, limits and commercial-use rights vary by product and plan, though they typically watermark output and often restrict commercial use — so learn free, and only pay once a specific limit blocks something you’re actually publishing.
Q2 — Scenario: a solo founder testing product advertisements: “I want to test five ad concepts this week without a videographer. What’s the fastest realistic workflow, and can I legally run these as paid ads?”
Answer: Fastest realistic workflow is concept-testing, not finished cinema — which happens to be exactly what AI video is best at right now. Run the Section 2 pipeline in miniature: have your LLM write five 15-second scripts as shot lists, generate one strong hero still per concept with your Step 4 formula, animate each into two or three short shots, add TTS narration plus captions, and assemble.
You can have five testable concepts in an afternoon, spend nothing on production, and let the ad platform’s data tell you which one deserves a real budget — that’s the actual founder ROI here, cheap iteration rather than cheap final assets.
On the legal question, two checks before you spend a cent on media: Commercial-use rights depend on the specific vendor, plan, input materials and applicable terms, so check the current licence before using an output in paid advertising, with free tiers frequently restricting commercial use or forcing watermarks, so read the current terms of your specific tool — and second, apply Section 5’s disclosure rules, because paid advertising is the highest-visibility, highest-scrutiny place to publish synthetic media.
Label it, keep the provenance metadata, use the platform’s AI-content toggle.
Q3 — Scenario: a teacher planning a media-literacy lesson: “My students are already making AI videos on their phones. How do I teach this responsibly instead of pretending it isn’t happening?”
Answer: Teach it as production and provenance in the same unit — that pairing is the whole lesson, and your timing is excellent because the rules just became concrete.
Start with a creation exercise so the technology stops being magic: have groups build one 30-second video through the four-stage pipeline (script as a shot list, generate visuals, add voice, edit), which teaches storyboarding and editing — durable skills that survive any tool change.
Then flip to the critical half: show them the failure modes from Section 1 and run a spot-the-synthetic exercise, then introduce disclosure as a professional norm rather than a punishment, using the August 2026 EU deadline as a real-world anchor — labeling AI content is now what working creators are legally expected to do.
Two classroom guardrails: check each tool’s minimum-age and account rules through your school’s IT policy before rollout, and establish one absolute class rule from Section 4 — never generate a real person’s voice or face, including classmates and teachers.
Students who learn to make it and label it are the ones who won’t be fooled by it.
7. Cheat Sheet: The One-Person Video Pipeline
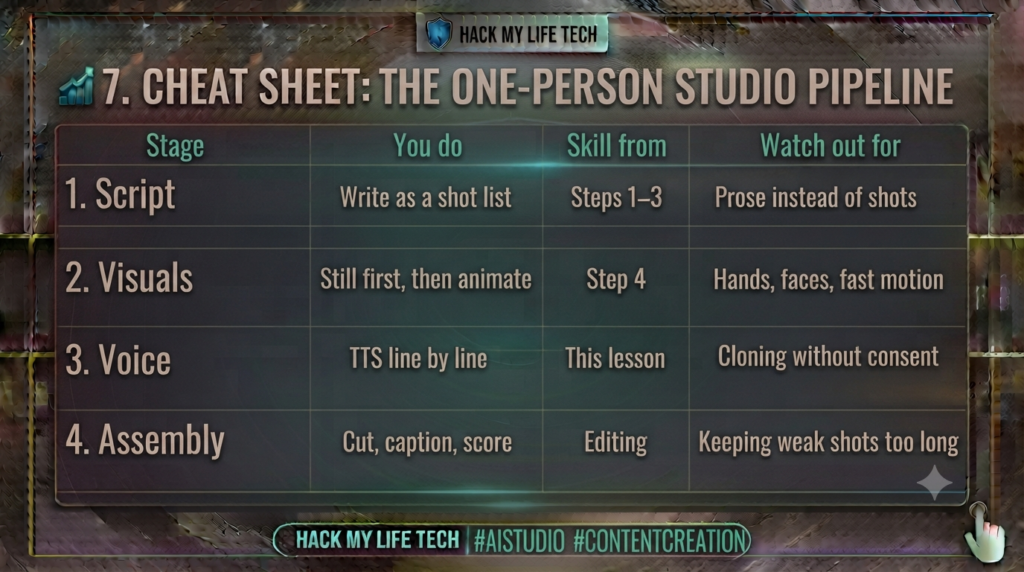
The three motion levers: one action per shot · explicit camera movement · short, deliberate pacing. The disclosure checklist: visible AI label · keep C2PA/provenance metadata · use the platform’s AI-content toggle.
⚡ 8. Try It Today: Your First 30-Second Video in One Hour
Nobody learns a pipeline by reading it. Build one small thing today:
- Script it as shots (10 min). Ask your AI for a 30-second script broken into 5 shots with visual, camera, action, and narration for each.
- Make one hero still (10 min). Use your Step 4 S-S-C-L-M formula for shot 1. Iterate until you’d be happy to publish it as a photo.
- Animate it (15 min). Feed that still into an image-to-video tool with one action and one camera move. Generate three takes; keep the best.
- Add voice and assemble (20 min). Generate narration line by line, drop everything into any free editor, add captions, cut anything ugly.
- Label it (2 min). Add “Created with AI” to the first frame or description before it goes anywhere. Section 5 is not optional.
One hour, and you’ve run the entire professional pipeline at small scale — which is exactly how the professionals started.
📝 9. Recap & What’s Next?
Today your studio started moving:
- AI generates shots, not movies — write shot lists, stitch, and edit. Expectation calibration is the whole game.
- The four-stage pipeline: script (LLM) → visuals (image-to-video beats text-to-video) → voice → assembly, where quality is actually made.
- Motion adds three levers: one action, explicit camera, short pacing.
- Voice has a hard ethical line — your voice or documented consent, never words in a real person’s mouth.
- Disclosure is now law-shaped: EU AI Act Article 50 is enforceable from 2 August 2026 — visible labels plus machine-readable provenance (C2PA). Build the habit now.
You can now make AI think, know, assist, illustrate, and perform. But everything so far still waits for you to press the button. In the final phase, that changes: next lesson we hand AI the wheel with agents and automation — systems that plan, use tools, and complete multi-step work across your apps while you do something else.
And because delegation without supervision is how disasters happen, we’ll build the safety habits — limited permissions, human checkpoints — right alongside the power.
⏮️ Previous Lesson: [Deep Dive Step 4] AI Image Generation: Prompt Like an Art Director
⏭️ Next Lesson: [Deep Dive Step 6] AI Agents & Automation: Delegate Whole Workflows, Safely
Consent and publication note
Use only voices, faces, music, footage, and other assets that you are authorised to process. Record consent where appropriate, label synthetic media when required, verify platform advertising rules, and review every clip before publication.